Thursday, March 31, 2011

Family History Collage

My husband and I are both very interested in genealogy and researching our family trees so for Chris' birthday I decided to create a collage of documents and photos of his grandfather, Thomas.


I didn't take any pictures during the process (oops) but it's made up of very simple elements. I started with a background of brown paper. Then I cut four pieces of 12x12 scrapbook paper into triangles of various shapes and sizes and glued them down like they were a puzzle.


Instead of using the original photos and documents I scanned everything and then printed copies from our home printer. This way I don't need to worry about UV damage when the frame is hanging in direct sunlight. The last piece was to include a few embellishments in the form of keys and journalling tags, both made by K&Company.


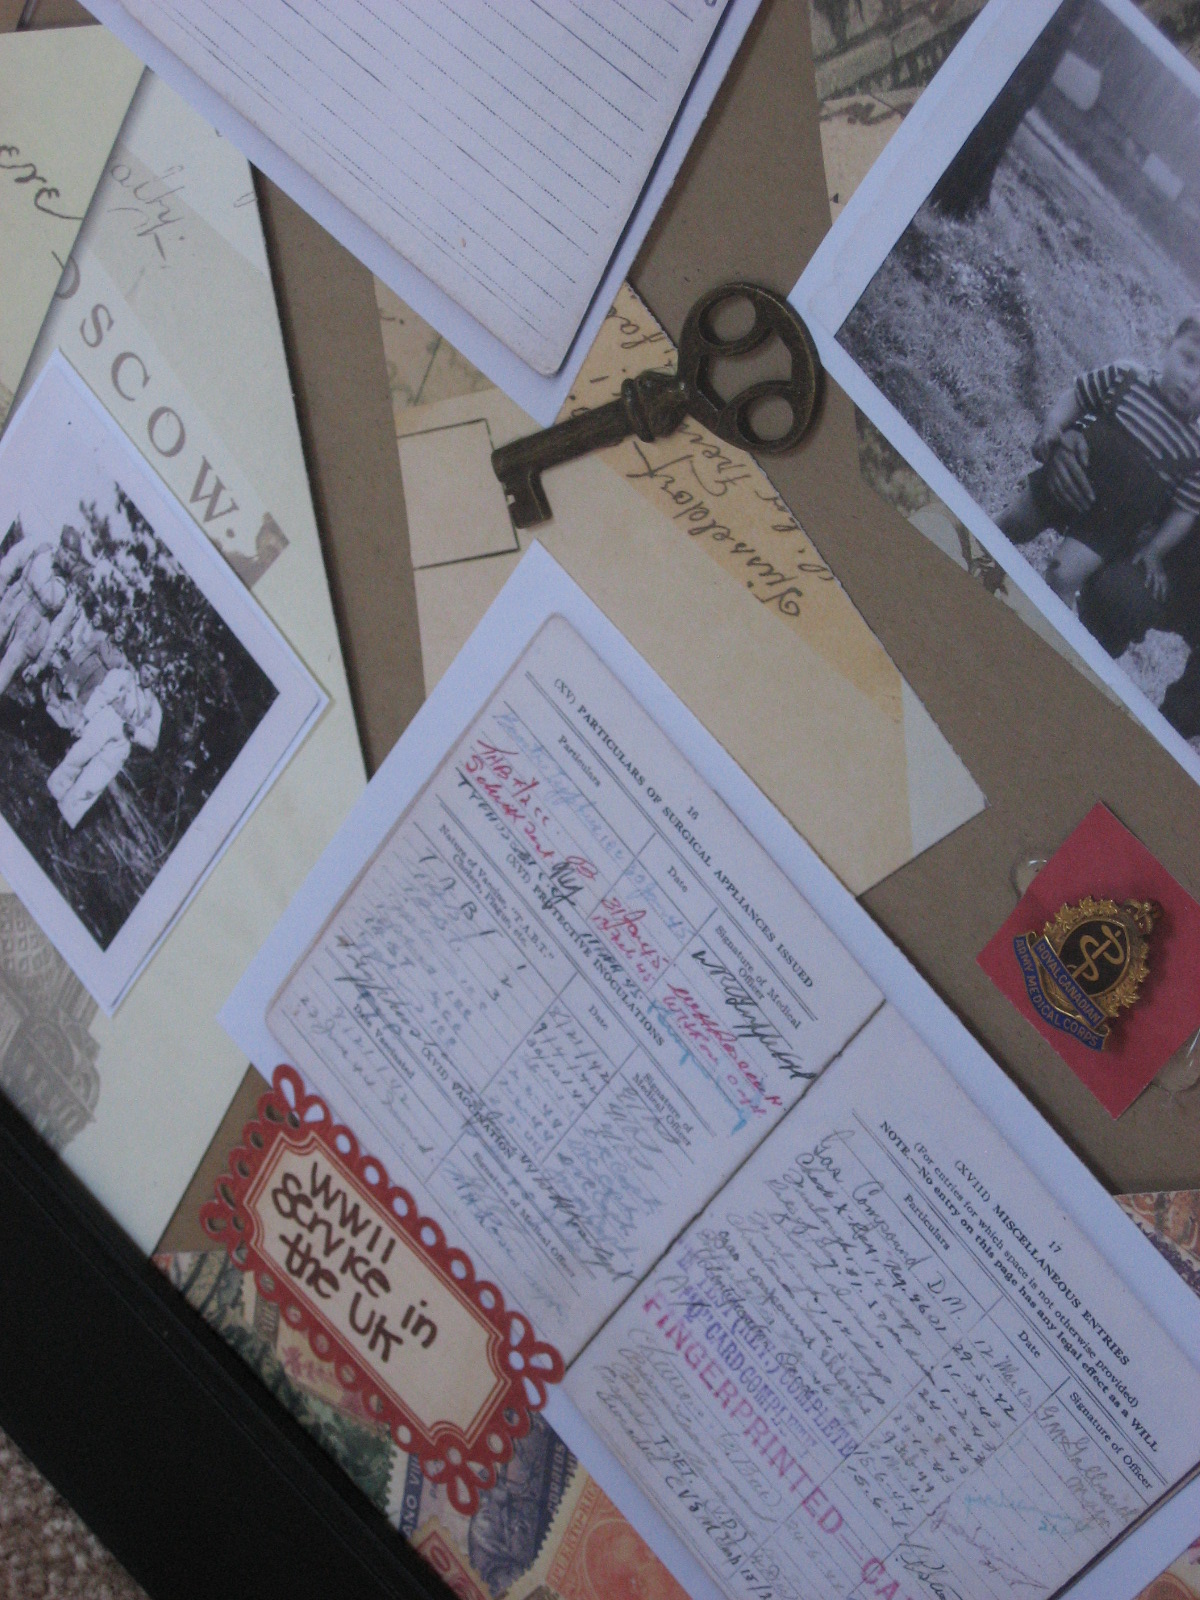
You really do need to click on the photos for the full size version in order to get the full effect. The picture above include pages from Thomas' army service book from WWII - the scanned and printed version looks pretty cool.

The best part is that Chris really loved the collage and it's now hanging in a place of honour in his office. I think I'll start on a collage of someone in my family history next!

Wednesday, March 30, 2011

Party Perfect - The Party Dress Magazine

Today I wanted to share an awesome party planning resource in the form of a website called The Party Dress. Founded in 2009, The Party Dress is a website dedicated to all things entertaining.  It provides daily eye candy and entertaining tips to encourage readers to get creative!  They offer inspritation for all sorts of events and have great DIY ideas so you know I'm a fan!

This month it got even better with the release of the first issue of their online magazine. Click here to check out it!


It's got a million awesome ideas for showers, weddings, birthdays and more. My favourite feature has to be their Easter Bunny Brunch for children. So many super cute ideas that make me wish I had a little one just for the occasion!

via

via

via

Adorable, right? Head on over and check out the magazine for yourself. I guarentee you'll be inspired!
Now if only they'd ask me contribute... :)

Tuesday, March 29, 2011

DIY Birthday Cards

Just a quick post today to share a couple of the birthday cards I've made over the past week and to show you again how really simple card making can yield a lot of oohs and aahs!


My friend Leslie had a birthday this past week and I was excited to make her a really pretty, girly card. I started by gluing some polka dot paper to cardstock and then tearing a purple piece of paper for a background. I think the torn paper really suits the vintage feel of this card.


Next I added various vintage-y elements from a K&Company collection. I thought the "Thinking of You" tag was just too cute!

As I mentioned previously, my husband's birthday was this past weekend. I tend to keep his cards pretty basic because I know he appreciates what I write inside a lot more than the design on the front. Despite that, I still thought this one turned out pretty cute.


I used cardstock and a 4x6 journaling  mat that I cut to size. Then I wrote my message in marker and added a dimensional birthday hat sticker from K&Company (I absolutely love their stuff!).


And there you have it, two cute cards made from nothing but paper, a few strore-bought elements and a little imagination. And they're way nicer than the ones I could have bought in store for $5! I don't know why everyone isn't making their own cards ;)


Monday, March 28, 2011

By the Batch - Mile-High Peanut Butter Birthday Pie

Ok, I know you don't really make pies by the batch but I didn't have the chance to make cookies this weekend and I didn't want to abandon my baking feature for the second week in a row so pie it is! This past Saturday was my husband's birthday and, in honour of the occasion, my mom made him a birthday pie - Mile-High Peanut Butter Pie to be exact.


Ingredients:
3/4 cups graham crumbs
1/4 cup butter, melted
1 pkg. (4-serving size) Jell-O Chocolate Instant Pudding
2 cups cold milk, divided
125 g  cream cheese, softened
1 pkg. (4-serving size) Jell-O Vanilla Instant Pudding
1/2 cup smooth peanut butter, divided
2 cups thawed Cool Whip Whipped Topping, divided

Directions:
Heat  oven to 375ºF. Mix crumbs and butter until well blended; press onto bottom and up side of 9-inch pie plate. Bake 10 min.; cool.

Beat chocolate pudding mix and 1 cup milk with whisk 2 min. (Pudding will be thick.) Spread onto bottom of crust. Gradually add remaining milk to cream cheese in large bowl with mixer until well blended. Add dry vanilla pudding mix; beat 2 min. Reserve 1 Tbsp. peanut butter. Add remaining to vanilla pudding mixture; beat until well blended. Stir in 1 cup Cool Whip. Spread over chocolate pudding layer to within 1 inch of edge. Spoon remaining Cool Whip onto centre of pie.Refrigerate 3 hours.


According to Sarah:
I didn't make this one but I watched it get made so I feel safe in saying that it was pretty easy to put together. The ingredients are ones you're likely to have around the house too which is nice. As to taste, it was quite good - not too sweet and just the right amount of peanut butter. The birthday boy definitely approved too and was quite excited to have his first birthday pie instead of a standard cake. I don't know if this will make it into regular rotation around here but I'm definitely putting the recipe away to try it myself at some point.

Friday, March 25, 2011

DIY Chocolate Easter Eggs

Easter is now officially less than a month away which means it's time to start decorating my house. My first project this year was DIY chocolate eggs.


I bought a bag full of plastic eggs for a couple of dollars. I took five and sanded them all over to rough them up a bit and give the paint something to stick to.


Then I gave them three good coats of brown acrylic paint. I painted tops and then bottoms and used part of an old egg carton to hold them in place while they dried.


You can still see the line where the top joins the bottom when you look closely but, other than that, I think they look pretty chocolate-y.

I love Easter decor!

Thursday, March 24, 2011

Office Baby Shower

Today at work we had a little lunchtime baby shower but with a twist - our guest of honour was a male colleague! Needless to say he was quite suprised but I think he was also touched and pleased as well.

I made a diaper cake.


I loaded it with tons of baby stuff in gender neutral colours since they don't know whether it's a boy or a girl.


It was kind of nice to make a yellow and green cake versus the typical blue or pink. The little puppy dog slippers are my favourite thing on the cake.


I also wrapped some organic Gerber sleepers and onesies up in a brown paper bag with ribbon - trying to keep the present as un-girly as possible. I couldn't resist adding the "I love daddy" bib. So cute!


The last project was making the card. I folded a piece of brown cardstock and glued on the background paper and then letters to spell  Baby. I think it turned out simple but still really cute.


I love making these diapers cakes and other gifts for babies and would love to turn it into a business someday. I just can't resist cute :)

Wednesday, March 23, 2011

Party Perfect - DIY Pomanders

I'm seeing pomanders, otherwise known as kissing balls, everywhere for spring. Not only are they a unique way to bring flowers into your spring decor, they also have many uses for a wedding. I like the idea of pomanders as pew markers and as bridesmaid "bouquets". You can buy them or you can make yourself on the super cheap!


I started with some silk hydrangeas that I had leftover from my wedding. I can't remember the specific price but I know I bought them when they were 40% so they were pretty inexpensive. I cut off each individual blossom taking care to leave a piece of stem attached to each.

Next I took a big Styrofoam ball that I got for a dollar at my local dollar store and I coloured all over it with a purple marker. This step would have been way easier with paint but I didn't have any in the right colour and it doesn't really matter that the marker was a bit streaky because you won't don't see much of it in the finished product. That doesn't mean you should skip this step - I tried just attaching the flowers to the white ball and stopped halfway through because you could totally see the white.


I pinned a loop of ribbon where I wanted the top to be. Cross two pins over each other for extra strength. The next step is to take a piercing tool (or a needle or anything sharp that can make a straight skinny hole) and poke a hole into the coloured ball. Then I pushed the little bit of stem I left on one of the flowers into the hole. Easy, right? Just start filling in all over the ball with holes and then flowers. Use your bigger flowers first so you can go back and fill in gaps later with smaller blossoms.


And that's it! Super easy and each one only costs a couple of dollars. I kind of wish I had tried this before my wedding because these would have been a really pretty addition!

Tuesday, March 22, 2011

DIY Utensil Art

When I saw Spunky Junky's Utensil Wall Art submission over at One Month To Win It I knew I had to try it myself since my kitchen walls are so bare. At the time, it was an anonymous contest submission so there was no obviously no tutorial. Since then, Halsey has posted instructions but I had to go it alone because I was too impatient to wait.


Two weekends ago I dragged my poor husband to Value Village (not his favourite place!) to find some old utensils and pictures frames. I was not disappointed - there were TONS of bags of utensils to choose from so I picked ones that had details on the handles. I got six pieces for $0.99. I also picked up a wooden frame for $1.99.


The first step is to clean everything really well. Once that was done I sanded the finish off the frame until I was left with bare wood and then painted it white with acrylic paint and a brush. It took two coats until it looked good as new.

The next step was painting the utensils. This part was a bit trickier since I was using a brush when I really should have used spray paint but I persevered. It took about three coats to get a smooth finish and I worried that paint would glob up in the details on the handles but it didn't and they are still completely visible.


Once everything was dry I cut a piece of scrapbook paper to fit my frame, inserted it and then hot glued my utensils on. Voila - art for my kitchen that only cost me $3!


I have an extra set of painted utensils just waiting for a frame. I'm thinking it might make a cool housewarming gift. Thanks to Halsey for the inspiration!

Monday, March 21, 2011

Spring Egg Decor

Yesterday was the first day of spring here in Canada and I could not be happier. This winter has dragged on forever and I think we could all use a little sunshine in our lives. To celebrate the start of my favourite season I put together an easy and inexpensive project in under 5 minutes.


Pretty simple, right? But I think there's something really cute about it too.


I took an antique mason jar (but you could use any jar as long as long as the mouth it big enough to fit the eggs in) and stuck some raffia at the bottom. Push it down with a wooden spoon if it's not cooperating. Then I piled in some speckled eggs and put the glass top back on.


So easy to do but I'm so happy with how it looks sitting in the sunshine with our plants.


I've made a few other projects that I can't wait to share! Have you started decorating for spring?

Friday, March 18, 2011

For Japan, With Love


Please click here or on the poster to donate to ShelterBox.
For my fellow Canadians, you can click here to donate to the Canadian Red Cross.
Every little bit helps. Please give what you can.

Thursday, March 17, 2011

St. Patrick's Day Projects 2011


Hope everyone is having a wonderful St. Patrick's Day! Even I, who very rarely drinks, will be raising a glass this evening. In the meantime, I wanted to round up all of my St. Patty's projects from this year into one post. One stop bookmarking for the things you'll make next year ;)


I started with my plant tag.


Then I made my St. Patrick's Day wreath - which I might rename my Spring wreath for a while because I really like it!


There were my Irish blessing printables.


I "grew" a rainbow in tiny terracotta pots.


Made a delicious Guinness Chocolate Cake.


And I created a bouquet of paper shamrocks.


And while I did enjoy creating for St. Patrick's Day, I'm also pretty excited that I can start with the Easter projects and decorations this weekend!

Sláinte!