Friday, December 30, 2011

By the Batch - Cheesecake Cookie Dough Bars

Normally around the holidays I bust my butt in the kitchen making all sorts of cookies to give to family, friends and colleagues. This Christmas, being pregnant and always tired, I decided to forgo the tradition. Instead I didn't bake anything until my week of holidays during which I baked only recipes that sounded good to me! And that's how I ended up with these amazing Cheesecake Cookie Dough Bars.


I used a recipe found on Brandy's Baking. While the recipe does have a lot of ingredients and steps it was surprisingly easy to do. I'll apologize now for the lack of pictures in this post - I got into the baking zone and forgot to take any until the bars were completely done - oops!

Ingredients:
Crust:
1 1/2 cups graham cracker crumbs
5 tablespoons unsalted butter, melted

Chocolate Chip Cookie Dough:
5 tablespoons unsalted butter, room temperature
1/3 cup packed light brown sugar
3 tablespoons granulated sugar
1/4 teaspoon salt
1 teaspoon pure vanilla extract
3/4 cup flour
2/3 cup chocolate chips

Cheesecake Filling:
10 oz cream cheese, room temperature
1/4 cup sugar
1 large egg, room temperature
1 teaspoon pure vanilla extract

Directions:
Preheat the oven to 325 F. Line an 8" square baking pan with parchment paper allowing a little overhang and spray with nonstick cooking spray. Mix the melted butter and graham cracker crumbs until thoroughly combined. Press the mixture into the bottom of the prepared pan. Bake in preheated oven for 6 minutes. Remove pan to a cooling rack.

While the crust is cooling, prepare the chocolate chip cookie dough. In a large bowl beat butter, brown sugar, granulated sugar, salt and vanilla until smooth and thoroughly combined, about 1 minute. Mix in the flour on low speed until just incorporated. Mix in the chocolate chips. Set aside.

In another large bowl cream together the cream cheese and sugar until smooth. Mix in the egg and vanilla on low speed just until incorporated. Pour the cheesecake batter into the prepared crust. Using your hand to form clumps, distribute the cookie dough onto the top of the cheesecake batter in teaspoon-sized clumps. 

Bake for about 30 minutes, until the top feels dry and firm and the entire pan looks set if given a gentle shake. Move bars to a cooling rack and allow to cool completely. Chill in refrigerator overnight or for at least a couple hours.

And that's it - you're left with extremely delicious bars that are dangerous to have around the house! I've pinned this recipe and will definitely be returning to it again - maybe next time I'll actually share some ;)

Wednesday, December 28, 2011

DIY Baby Closet Dividers

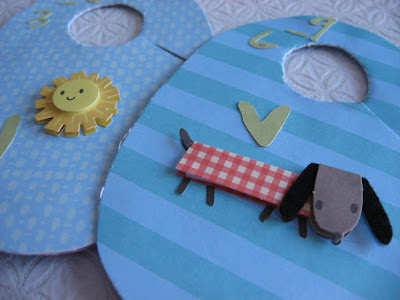
Now that the holidays are over I can start focusing on projects for the baby's room. Which is good since my son is set to arrive in about 7 weeks! Yesterday I organized all his clothing and, since he already has so much in so many different sizes, I decided his closet needed some dividers. There are a ton of cute ones for sale on Etsy but I was pretty sure I could make them myself on the super cheap and I was right!


I used this tutorial from Fresh Crush as my inspiration and then added some touches of my own. I started by cutting oval shapes out of a gift box and then covering them with scrapbooking paper (in the same oval shape) on both sides. Next I traced a circle on each (I used the cap from a carton of half and half but you can use anything as long as it's bigger than the bar you'll be hanging the tags on) and cut them out by cutting into them on an angle. This angle cut is what will allows them to slip them over the bar in the closet.


Next I used my Silhouette to cut out the numbers for each divider as well as little hearts. I glued those on and then, as a finishing touch, added cute little stickers to each divider.


This project only took me about an hour and a half, used all materials I already had on hand, and I'm so pleased with the results. Even my husband thought they were pretty cute and it's not easy to get him enthused about closet organization ;). The best part is that I think these will really come in handy once baby has arrived. And to save you from wondering, I'm left-handed and I hang all my clothes up backwards - if you're going to try these yourself make sure consider which way your clothes will hang when labelling your dividers!


P.S. Linking up to


Paper Issues Blog Design

Friday, December 23, 2011

Last Minute Christmas Printables

It's the evening of December 23 and I can't believe I've only got one day left to prepare for Christmas! Today was devoted to baking (I'll be sharing those results next week) and tomorrow is for wrapping. At least all the shopping is done! If, like me, you're busy with last minute preparations you might appreciate this round up of freebie holiday printables.


Need to keep the little ones busy so you can get everything done? Why not decorate this Christmas tree courtesy of Babalisme. Simply print, cut and let the kids design their own trees. Be sure to visit Babalisme for lots of other adorable freebies as well!


Maybe you're looking for a little last minute decor. If so, check out this cute Holiday Banner from eighteen25. Download and print the pennants and then use white cardstock, bias tape and adhesive to put it all together. They've even put together a tutorial to makes things really simple.


If you're giving away baking as gifts then these tags from Everybody Likes Sandwiches will come in handy. The download includes tags in a few different colours with various baking themed wishes.


If you're still wrapping gifts then you really need to check out this year's Holiday Gift Tag collection from the super talented Helen Dardik of Orange You Lucky! I love that she's got you covered for Christmas and Hanukkah. Click the link to see the full collection and make sure you check out last year's tags as well.

Last but not least, my most viewed post this month has been the Christmas tag printables I created last year. If you haven't seen them you can check them out and download them from here

Well that's it for this holiday season. I hope everyone celebrating Christmas has a very merry one!

Tuesday, December 20, 2011

Christmas Paper Cone Wreath

I've been seeing all kinds of variations on the paper cone wreath around blogland and decided it was time to try one myself. So I gathered up some paper and started rolling cones.


I made 16 large cones and 16 smaller ones. The large ones are made from 6x6 squares of scrapbook paper and the smaller ones are 4x4 pages I pulled out of an old dictionary. I found rolling the cones to be a bit tricky at first but I eventually got a rhythm down. The key is to make all your cones as close to the same size as possible.


Once I had all of my cones I cut a circle out of a cereal box and started arranging. I glued a jar lid in the centre of my circle and used that as a guide for the placement of my larger cones. Make sure to lay everything out before gluing anything down - it took me a few tries to get my various patterns into good order. Once I was happy with the placement of everything I hot glued the larger cones down and then hot glued the little cones in between them.

The last step was to cover my jar lid. I cut a circle of scrapbook paper and the Merry Christmas message, inked them and glued them to the centre.


I think it turned out really nicely. I gave this one as a gift but I think I might have to make another to hang in my house. I've also been hunting for a new tree topper and think a smaller version might be just right!

Friday, December 16, 2011

Yarn Winter Wreath

Last year I made a winter wreath that I never really liked all that much. When I didn't even want to hang it up this year I decided it was time to try my hand at another. I started with a ball of yarn I had picked up on clearance months ago (never know when discount wool might come in handy!) and a straw wreath form and got to wrapping. I'm very pleased to say that I love this year's wreath!


My pictures don't really do it justice - it was dark last night when I finished (when isn't it dark this time of year?) but I'm too excited to wait for a sunny day to share. I will try to replace some of the pictures once I can take some better ones.


As you can see, I kept it pretty simple. Once the wreath was wrapped I made some paper pinwheels and put glittery snowflake stickers in their centres. I paired the pinwheels with a pretty paper flower.


I bought two clearance picks at Michaels, layered them and then tied them to the wreath with some sparkly ribbon.


The last step was to hang a pretty snowflake ornament in the centre to catch the sun.

And there you have it, simple, pretty and with this colour scheme I can keep it on the front door well past Christmas!

Monday, December 12, 2011

Easy No-Bake Chocolate Cheesecake

Want to make the world's easiest chocolate cheesecake? Have I got the recipe for you! But first, a few disclaimers. When I made this recipe I was expecting traditional cheesecake consistency and that's not really what I got. This cake is more of a fudgey or mousse-like texture. I also thought it would look more like cheesecake (see the picture from the original recipe) but mine actually turned out looking more like chocolate pudding. I'm not sure exactly what happened as I followed the recipe exactly, save for substituting a graham cracker crust for the Oreo crust suggested. Now that isn't to say the cheesecake didn't turn out incredibly because it absolutely did. It's incredibly rich and delicious despite not being the cake I envisioned. If you're ok with that then on to the recipe!


Ingredients:
3 (8 oz.) blocks cream cheese (softened)
1 can sweetened condensed milk
1-1/2 cups chocolate chips
Pie crust - the original recipe calls for an Oreo crust but I had graham cracker crumbs so made mine using those and butter.

Directions:
Melt chocolate chips with 1 Tbsp. oil in microwave for 1-1/2 minutes until melted, stirring every 30 seconds. Add melted chocolate to softened cream cheese and sweetened condensed milk and beat until well blended. Pour into pie crust and refrigerate until set.


Super easy, right? Three ingredients for the filling and no baking! And while the look and texture might not be very "cheesecakey" the taste definitely does the name justice. I garnished mine with some of the crust and a little whipped cream and it was a huge hit. File this recipe away for the next time you're looking for quick, easy and delicious.

Monday, December 5, 2011

Peanut Butter Marshmallow Squares

When the lovely ladies over at Hoopla listed these Peanut Butter Marshmallow Squares as one of the things they saw and loved last week I was reminded just how delicious and easy they are and decided they'd make the perfect Sunday afternoon baking project.


These squares are so easy that you barely need a recipe and you might just have the ingredients already in the house. All you need is:
  • 1/2 cup butter
  • 1 cup peanut butter
  • 1 bag of butterscotch chips (300 g)
  • Mini marshmallows
Melt the butter, peanut butter and butterscotch chips in a pot over low heat. Once the mixture is melted and smooth take it off the heat and wait 5 minutes or so until it thickens up. After that dump in some marshmallows - I just eyeball how many to add, it depends on your tastes. Once the marshmallows are coated press the mixture into a greased 9x11 pan. Then stick the whole thing in the fridge to let it harden - or the freezer if you're in a hurry!

Super easy but also really tasty. Something tells me they aren't going to stick around my house for long!