Friday, September 30, 2011

Friday Odds & Ends

Can you believe it's the last day of September? Where has the time gone? Just popping by quickly today with a few small updates. First, I'm super excited that I'll be guest posting over at Clean & Scentsible as part of Jenn's Ghostly Gathering! I'll be sharing a quick and easy Halloween décor tutorial on October 6 - be sure to stop by and check it out.


In other good news, I was thrilled to find out yesterday that I won a $100 gift certificate to inVU Drapery Co courtesy of Staci Edwards' blog Inspired by Life. We need a window treatment for the baby's room so this couldn't have come along at a better time. I'm so excited to shop - thanks again, Staci!


Rosh Hashanah ends today and we will be celebrating with a special dinner. I'll be back next week with a recipe and review for Apple and Honey Bundt Cake. Apples and honey are symbolic of a sweet new year - not to mention that's a delicious combination!

  
This weekend we'll be visiting our favourite gourd and pumpkin stand so I can create another version of last year's fall planter. It'll be time for Halloween decorations before you know it so I want to make sure my fall stuff gets a chance to stand alone first.


We'll also be going to the Toronto Zoo this weekend - weather permitting! I really want to see the African Penguins. They are endangered and a new species at the zoo this year. The zoo had a clever ad campaign running this summer and it clearly worked on me.


The last of my updates is that I am 20 weeks pregnant today! I have my next ultrasound this coming Wednesday and hopefully baby will cooperate and we will find out the gender. You'll be seeing an influx of baby projects after that!

Have a great weekend everyone!

Thursday, September 29, 2011

A Happy Birthday

This past weekend we celebrated my dad's birthday. The family got together to eat cake and watch Dad open presents. I made the cake and decided to keep it simple - chocolate cake with chocolate icing covered in candy.


I went with M&Ms because my dad's initials are M.M. When I asked Chris to pick me up a big bag at the grocery store I had to convince him that was the reason and it wasn't just a pregnancy craving!

I also made a birthday card with a collection of paper embellishments that made me think of the birthday boy. I love how cards can come together using random pieces that you might not think belong together.


Happy Birthday, Dad!

Monday, September 26, 2011

By the Batch - Lemon Bars

My husband generally doesn't take much interest in my pinning but he sure took notice when I pinned this recipe for Lemon Bars from Less Cake More Frosting. And he's been asking me to make them ever since. This weekend I finally did and boy am I glad - these things are seriously delicious!


Ingredients:
For the Crust
2 cups Flour
1/2 cup Icing Sugar
1 cup softened Butter

For the Filling
4 beaten Eggs
2 cups Sugar
8 tablespoons Lemon Juice
4 tablespoons Flour
1/2 teaspoon Baking Powder


Directions:
Blend first 3 ingredients. Press into greased 9×13 pan. Bake @ 350 for 25 minutes.
Once the crust is baked and cooled, mix remaining ingredients together well. Pour mixture over the cooled crust. Bake @ 350 for 25 minutes.

I didn't have my camera so I wasn't able to take any pictures of the process but this recipe is so simple that you really don't need any. If you'd like some additional tips for making this recipe then I suggest heading to the source - Lara has provided all her secrets for getting the bars to turn out perfectly.


Happy Baking!

Wednesday, September 21, 2011

Magnetic Calendar - September

Well I've completed my September calendar and there are still 9 days left in the month so I'm calling it an accomplishment! I think the thing to remember is that I'll have it up for many Septembers to come so it's not so bad that it's only for a week this year.


Even though September makes me think of fall I didn't want to go too overboard since really most Septembers are quite mild here and the leaves are really only just beginning to change colour. So instead I tried for more of a harvest feel with reds and golds. I mixed in some fall flowers, a couple of apples and some of the cutest owl stickers I've ever seen. Here are some close-ups so you can see the details.


As always, if you'd like to see the rest of my completed months (I've finished 7 now!) or you'd like more information on how they're created you can click here.

Now I better get moving on October!


 P.S. Linking to:

Monday, September 19, 2011

By the Batch - Mom's Banana Bread

One of my favourite things about fall is that cooler weather means we can actually use our oven without the house turning into a sauna. I've hardly baked at all over the last few months but I've got big plans for that to change. I'm bringing back my By the Batch series so be sure to visit on Mondays for recipes and ideas to indulge your sweet tooth! This week I made my Mom's Banana Bread.


Ingredients:
1/2 cup margarine
2/3 cup white sugar
2 eggs, beaten
1 cup banana (approx 3 bananas)
1 1/2 cups flour
2 tsp baking powder
1/4 tsp baking soda
1/2 tsp salt
Optional - 1/2 cup of chocolate chips or nuts


Directions:
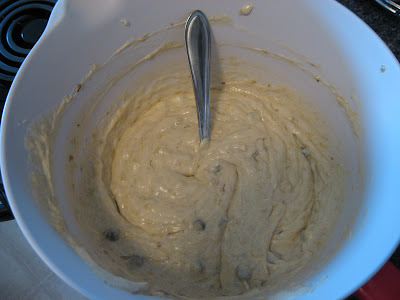
Cream margarine with sugar. Add eggs then add banana. Mix other ingredients in a separate bowl. Mix wet and dry ingredients together. If using chocolate chips or nuts, mix them into the batter.


Pour into a greased loaf pan and bake at 300 for 45 minutes to an hour.


According to Sarah:
This is my mom's tried and true banana bread recipe and she has made it countless times over the years. For some reason hers always turns out much darker than mine but, no matter the colour, this banana bread always tastes great! With so few steps it's pretty foolproof. My one tip is to use rotten bananas - the blacker the skins the better. If your bananas aren't rotten you'll want to put them in a blender before you try to incorporate them with your other ingredients.

I put chocolate chips in this loaf and then, to really make it sweet, I added some simple icing on top. I don't have a recipe for this, just add milk to icing sugar until you get a good consistency. I like to make it runny enough that I can just pour it over the bread and let it drip down the sides.


Is your mouth watering yet?

Saturday, September 17, 2011

My Memories Suite Winner

I don't normally post on the weekends but last night got away from me and I didn't have the chance to select the winner of the My Memories Suite Giveaway. Well better late than never!

Thanks to random.org the winner of the My Memories Suite is...comment #4!


Congratulations, Barcardi Mama! I'll be sending you an email with details on how to claim your prize - you're going to love playing with the software :)

Didn't win? Forgot to enter? No problem! I'm still sharing a special discount code that's good for $10 off the purchase of the My Memories Suite. You can get the software for only $29.97. And there's more - use the code and you'll also get $10 to spend in the online store so you can stock up on templates and embellishments. That means this code has a $20 value! To purchase the software with the special discount code just click here and then enter the following code during checkout: STMMMS48651


And if you need a little more convincing, here's another page I created from a free layout in under 5 minutes!


That's it for this post as I was at Michaels this morning taking advantage of some great sales on fall and Halloween items and now I've got a lot of crafting to do. Hope everyone is having a great weekend!

Thursday, September 15, 2011

DIY Nursery Decorations Vol. 2

As I've mentioned before, we are expecting our first child this coming February - tomorrow I'll be 18 weeks pregnant! And I believe I've also mentioned that, long before we were even trying for a baby, I wrote a post rounding up some DIY nursery ideas and it has become my most popular by a mile. Since I'm now collecting ideas for my baby's room I thought I'd share some more with all of you.

Via Carina Gardner

Every baby needs a mobile and what could be sweeter for a little girl than the swarm of butterflies on this Butterfly Chandelier? Head over to Carina Gardner's website and download the PDF instructions and a file you can use in your Silhouette to cut out the butterflies. Don't have a Silhouette? You could easily make these with a butterfly paper punch.

Via grace and light

Even the incredibly uncrafty mom could make this paper punch garland. Brooke at grace and light made this with paint samples, a heart punch and a needle and thread - but don't worry, there's no actual sewing required!

Via Positively Splendid

I love this idea for Lined Canvas Bins from Positively Splendid. The best part is that they are made using diaper boxes, something you're bound to already have on hand if you've got a baby. This project does require some sewing - I might have to sweet talk my mom to get myself some of these ;)

Via Fiskars

Last, I adore this Baby Monogram from Fiskars. It's made using not much more than scrapbooking paper and a canvas. They have little square canvasses like these at my local dollar store all the time so this project would be completely inexpensive. This version is obviously girly but you could easily make one for a boy too.

It's amazing how little you need to spend to create some really high impact projects! If you liked these ideas and you'd like to see more then be sure to check me out on Pinterest as I'll be pinning ideas for at least the next 5 months!


P.S. The My Memories Suite giveaway ends tomorrow and with only 4 entries so far your chances to win are great - don't forget to enter!

Tuesday, September 13, 2011

Fall Inspiration

The leaves are starting to change colour, the days are getting shorter and blogland is full of great ideas to help you celebrate the start of fall! Here are some of the projects and ideas I'm drawing inspiration from this season.


I love this adorable paper apple book from NoBiggie. It's just the right subject for early fall before you really want to pull out the pumpkins :)


While we're on the subject of apples - check out these yummy chocolate covered Oreo Apple Pops from Shindig Parties TO GO? They were obviously made with teachers in mind but who could resist them?


There are a ton of fall wreath ideas out there but this one from O. Alouette is my current favourite. I'm completely enamoured with these paper pinwheels and have been eyeing up a scoring tool of my very own.


Last, but not least, I absolutely love the look of these cornhusk votives from Martha Stewart. They are a simple way to add a little romance and elegance to your fall decor.

Hopefully you're inspired! I can't wait to start pulling out last year's fall decorations and to get started on some new ones for this year.


P.S. Don't forget to enter my My Memories Suite giveaway before the deadline on Friday!

I'm told some people are having trouble leaving comments. Don't forget that you can always leave Anonymous comments as long as you leave some way for me to contact you in the body of your comment. There are only 3 entries so far so your chances to win are good!

Friday, September 9, 2011

My Memories Suite Giveaway!

UPDATE - I'm told people are having trouble leaving comments. If you can't comment using your account then just leave me an Anonymous comment - just be sure to leave contact information in the body of your comment!

I've written before about digital scrapbooking and how great I think it is so you can imagine how excited I was to be contacted by the people at My Memories Suite about trying out their software and holding a giveaway for my readers!


Downloading this digital scrapbooking software is a snap and once you've got it installed it's incredibly easy to use. I made this layout in about 10 minutes using one of the free page layouts (yep, I said free!) available on the My Memories Suite website. All the elements were there and all I needed to do was add my photo and text. Click on the picture for the full size so you can see all of the pretty embellishments.


I also put together this calendar pretty quickly. It's so easy to coordinate background papers with the various embellishments. There are a bunch that come preloaded with the software and there are a ton more available for download.


But you can use the My Memories Suite for even more! I purchased the Spooky Halloween Pack and made some cute Halloween greeting cards.


Want to Win?

So now that you've seen what this software can do are you excited to win? Entering is easy - just visit the My Memories website and choose your favourite digital paper pack or layout. Then come back here and leave me a comment telling me your choice. Be sure to include your email in your comment as well. This entry is mandatory.

For extra entries (please leave a seperate comment for each):
1. Be a Follower of Sugar and Shimmer
2. "Like" Sugar and Shimmer on Facebook

I'll be choosing a random winner next Friday at 7:00 PM EST so be sure to leave your comments before then!

Can't Wait? Use the Discount Code!

So excited that you don't want to wait until next Friday to see if you've won? No problem! I'm also sharing a special discount code that's good for $10 off the purchase of the My Memories Suite. You can get the software for only $29.97. And there's more - use the code and you'll also get $10 to spend in the online store so you can stock up on templates and embellishments. That means this code has a $20 value! To purchase the software with the special discount code just click here and then enter the following code during checkout: STMMMS48651

I'm sure you'll love the My Memories Suite as much as I do so enter the giveaway or use the code today!


P.S. Linking to:


Wednesday, September 7, 2011

Easy/Impressive Cake Decorating

I may have mentioned that I was taking a Wilton Method cake decorating class at my local Michaels store. I had actually attempted to take the class a couple of years back but, due to health reasons, I had to quit halfway through. I'm pleased to say that this time around I received my certificate of completion along with a bunch of tips and tricks for cake decorating! Today I want to show you just how easy it is to add pictures and drawings to the tops of your cakes.


I made this cake in my second class. I wish I had pictures of the process to share but I was mostly covered with buttercream the whole time, not to mention the teacher probably would have looked at me strangely! But the concept is really simple.

All you need to start is a line drawing. Obviously, mine was of a cupcake but you can use anything you find on Google or in a colouring book - just try to keep it simple for your first try. Tape a piece of parchment paper over your drawing and then use piping gel to trace all of the lines. Piping gel comes in a tub or a tube - if you're not going to be using it often then just buy a tube. It doesn't really matter what colour since you'll be covering it up with icing.


Once you've traced your design, take your parchment paper and invert it onto the top of your cake. Use your finger or a little paintbrush to go over all of your piping gel lines. Then carefully peel back the parchment to reveal your drawing transferred onto your cake. The next part is easy - just fill in the design with various colours of icing!


Mine is far from perfect but it gives you the idea. The best part is that I only had to use one icing tip to make this whole cupcake (except for the skinny wavy lines on the cupcake bottom). I even used the same Wilton 12 tip to pipe the simple border at the bottom of my cake.If you want to try this out without investing in tips you can always just snip the corner of a Ziploc back and pipe your icing through the hole!

Easy and impressive - try this for your next birthday celebration!

Tuesday, September 6, 2011

Magnetic Calendar - August

That's right, it's only just become August in my house! I've already explained the reason for my tardiness so let's just get to the calendar.


I wanted to make this month a celebration of the end of summer so I went with bright and tropical colours, pretty butterflies and flowers and cute little fruit stickers. You can see we also celebrated a family birthday in August so the little cupcake circle is back again.


And with that I've completed 6 months - I'm halfway there! To find out more about I make my calendars and to see the rest of the completed months just click here. And stay tuned as September will appear very shortly!


P.S. Linking this up to