Monday, February 28, 2011

By the Batch - Langues de Chats

Between Valentine's Day cupcakes and then last holiday Monday I'd gone two weeks without baking anything from Martha Stewart's Cookies. Yesterday it was time for that to change so I made up a batch of Langues de Chats or Cat's Tongues. Unfortunately, I don't have a link for you since the version on Martha's website is very different from the one in the book.


Ingredients:
2/3 cup plus 1 tablespoon all-purpose flour
1/4 teaspoon salt
7 tablespoons unsalted butter, room temperature
3/4 cup confectioners’ sugar, sifted
2 large eggs
2 teaspoons pure vanilla extract


Directions:
Preheat oven to 375° F. Sift together flour and salt in a bowl.
Put butter into the bowl of an electric mixer fitted with the paddle attachment; mix on medium speed until pale and creamy. Mix in confectioners’ sugar. Add eggs one at a time, mixing well after each addition. Mix in vanilla. Fold in flour mixture.

Transfer batter to a pastry bag fitted with a 3/8-inch plain round tip. Pipe 2 3/4-inch lengths about 3/8 inch wide (the ends should be slightly wider than the centre) onto baking sheets lined with parchment, spacing about 1 inch apart.

(Sarah's note - If you don't have the proper tip then you could easily pipe these through a Ziploc bag with the corner snipped off so don't let lack of equipment deter you!)


Bake until just golden around edges, 10 to 12 minutes, rotating sheets halfway through. Let cool on sheets 3 minutes. Transfer to wire racks; let cool completely. Makes 5 dozen.

According to Sarah:
These were very easy to whip up but, on their own, these cookies are nothing to write home about so at first I was disappointed. It was only when I realized that they are the same taste and texture as a funnel cake that I figured I was on to something. I served them last night with warm strawberry jam, some whipped cream and a dusting of icing sugar and they were fantastic!


While not really an every day cookies (they're no chocolate chip!) I will keep this recipe on hand the next time we have dinner guests and I want to serve something unique for dessert.

Friday, February 25, 2011

Origami Lucky Stars

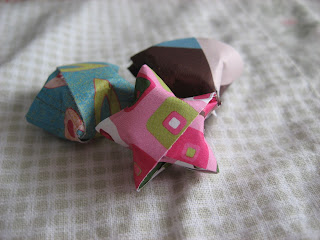
Just a quick post on this Friday afternoon as we all gear up for the weekend. I found these instructions for making Lucky Stars out of strips of paper and I'm addicted!


I made these little guys out of of strips of paper that were 1 inch by 12 inches. They turn out to be about as big as a quarter.


You can make one in just a couple of minutes and your kids can help too! I'm currently working on filling a vase with them - who couldn't use a little extra luck?
Have a great weekend!

Thursday, February 24, 2011

St. Patrick's Day Wreath

It never ceases to amaze me how much wreaths sell for ($50!!) when they are so inexpensive to make. Case in point is my brand new St. Patrick's Day wreath.


Here's the breakdown of what I spent:
Grapevine wreath - $4.99
Ribbon - $0.20 (a small portion of a huge $2 spool)
Felt - $1.50
(I also used scissors and a glue gun but I already own those things so I'm not including them in my cost.)
Total Cost - $6.69 - not bad right?


I made the felt flowers in about an hour and then glued it all together in about 10 minutes. Inexpensive and easy. And I have to say that I'm totally in love!


P.S. Linking this post up to:

Wednesday, February 23, 2011

Party Perfect - Photo Wall

Martha has seriously done it again! When I saw this idea for a personalized photo wall it really made me wish I was planning a party.


I love that this one is made up entirely of pictures of the birthday boy but what about taking a photo of each guest as they arrive for a surprise party and building the numbers out of those? Or how about pictures of Disney characters or Dora the Explorer for a kid's birthday party?

I also think it would be cool to create a year in pictures for a New Year's Eve party by making a big 2011 on the wall using pictures you've taken throughout the year. And if I had seen this idea before our wedding I would have created a giant monogram on the wall using pictures of the whole bridal party!

Do you love this idea too?

Tuesday, February 22, 2011

St. Patrick's Day Plant Tag

All of my Valentine's Day decorations have now come down and so this weekend my house was looking a little bare. Rather than mourn the loss of pink and hearts I moved on to green and shamrocks! Since I don't really have a lot of St. Patrick's Day decorations I started improvising yesterday and came up with a way to turn a plant into an Irish-inspired centrepiece. It's as easy as a hanging circle tag!


Chris had recently bought me this plant and I thought the white blooms and green leaves lent themselves to well to St. Patrick's Day decor. I popped the pot into a wavy white bowl and then I made the the tag using three progressively larger circles that I inked around the edges with green marker and then glued together. I finished it off with some shamrock stickers and a bit of green ribbon to tie it to a little stake stuck into the dirt. It's hardly much of anything really but it adds a tiny bit of Irish flair to our table.


I might make some more and give plants as St. Patrick's Day gifts this year :)


P.S. Linking this post up to:

Friday, February 18, 2011

Weekend Antique Hunting

Here in Ontario we're gearing up for a long weekend (Monday is Family Day) and I'm excited to go antiquing on Sunday with my husband. I'm on the look out for specific items because I've got two crafts in mind - both Martha inspired.

First, I'll be looking for old glass bottles that I can turn into this...


These bottles are painted inside with white enamel that turns them different shades of green depending on the tint of the glass. I'm in love! Click here for the really easy how to.

Second, I'll be looking for old postcards, envelopes or advertisements that I can turn into this...


Our home really needs more art and this is such a great way to achieve it. Click here for tips on how to blow up pictures to poster size.

Wish me luck with my search - hopefully I'll have some results to share with you soon. Happy Weekend!

Thursday, February 17, 2011

DIY Paper Rosettes

I've been seeing crafts made out of the pages of books all over blogland and I decided it was time to try one myself. How cute are these paper rosettes?


And they're so easy to make. I used a tutorial from Under the Table and Dreaming and made these three in about 10 minutes while watching TV!

You can make them out of many materials. I made some with scrapbooking paper and I plan to make some out of felt to use on a wreath I'm working on.


These would also be really cute as gift toppers, on a hairband or with a magnet glued on the back and stuck on the fridge. I can't stop making them :)

Wednesday, February 16, 2011

Party Perfect - DIY Boutonnieres

For our wedding last summer I decided to do all of the bouquets, corsages and boutonnieres myself to save money. Since I'd never worked with flowers before I decided silk was the best option because I could make everything ahead of time. Michaels has a great selection of silk flowers and they are always going on sale when the seasons change. I bought everything at 40% off or better! Today I want to show you my DIY boutonnieres. I don't think I would call this a tutorial because they were so simple to do but I'll tell you what I did so you can see just how easy it is to make these yourself!


I started with a bunch of round purple flowers that looked like pom poms. I think there were about 6 blooms on each bunch so that would make 6 boutonnieres (told you I saved money!). Their leaves reminded me of dandelions so I cut the blooms off, each with a bit of stem attached, and tossed the leaves. I wrapped the stem with floral tape to make it dark green. Then, using more floral tape, I attached a leaf from a rose (I used silk roses in my bouquet and didn't need all the greenery) halfway down the stem so that it sat behind the flower. The last step was to tie a bow around the stem with a piece of ribbon and then insert a corsage pin so that guys could attach them to their lapels.

I used the same concept to make corsages for my mom and grandmother. I used two flowers instead of one, added a couple of extra leaves and tied the bow with wider ribbon.


Really easy, right? These were so simple and inexpensive but I have received so many compliments from people when they find out I made them. If you're planning a wedding or other special occasion on a budget then you should really give these a try!

Tuesday, February 15, 2011

Valentine's Day Cards

Ok, ok, I know that Valentine's Day is over but I really wanted to show you the cards that I made this year - mostly to show you how little time and few supplies you need to make cards. And I promise that this will be the last Valentine entry for the year ;)

I made two cards this year. The first was for my parents.


I started with a white card with some embossing around the edges. I bought these 8 for $1 at my local dollar store! Next I glued on a piece of scrapbooking paper that was all pinks and reds in a striped pattern. On top of that I layered two squares of cardstock (from one of those big variety packs) and finished with the XO stickers in the centre and a layered heart sticker in the corner. And that's it! One card, three small pieces of paper/cardstock and two stickers and I think it's quite pretty. Click on the picture for a bigger view.

The second card was for my husband.


Like many men, he's not really into pink and frilly so this is my "manly" Valentine's Day card. I started with a red card made of textured cardstock. I had cut the heart out of that piece of brown paper for another project (and kept the scrap because I never throw paper away!) so I stuck a scrap of polka-dotted paper behind it and then glued it down to the card. The "my valentine" is a sticker from a sheet that I bought on sale for a couple of dollars and then I wrote the "To:" with a red marker.


So I used a cardstock card, two scraps of paper, one sticker and a red marker. It doesn't get easier than that and Chris really liked it.

The best part is that I probably saved my self around $8 by making cards instead of buying them. Do you make your own cards?

Monday, February 14, 2011

By the Batch - V Day Cupcakes

In honour of Valentine's Day I took a break from cookies this weekend and made a batch of pretty pink mini cupcakes to share with family and friends.


The cake part is French Vanilla from a plain old Betty Crocker mix. The buttercream is homemade using the recipe I learned in my Wilton class.

Ingredients:
1 cup vegetable shortening
1 tsp clear vanilla extract (make sure it's the clear kind so you end up with true white icing)
1/8 tsp butter flavour
2 tbsp water
1 lb (approx 4 cups) icing sugar
1 tbsp meringue powder
Pinch of salt

Directions:
Cream shortening, flavoring and water. Add all other ingredients and mix on medium speed until thoroughly mixed together. Blend until creamy.

This recipe yields about 3 cups of stiff consistency icing. For these cupcakes I needed medium consistency so I added water by the tbsp until the icing was thin enough. To tint the icing pink I used gel food colouring.


I used a Wilton 22 tip and piped a swirl on the top of each cupcake, working from the outside in to the centre. Then I sprinkled on some coarse red sugar to finish them off. Easy and delicious - and the mini size makes people feel less guilty about indulging :)


Happy Valentine's Day!

Friday, February 11, 2011

Last Minute Valentine Garland

Still looking for a last minute Valentine's Day craft? This garland is super cute and incredibly easy to make!


I bought a bag of felt heart stickers at my local dollar store and then stuck them back to back on a piece of pink string.


Then I taped it over the front door to add a little colour to our otherwise very white front hallway.


15 minutes and about 50 cents and I've got another pretty Valentine's Day decoration. Try it yourself and have a great weekend!

Tuesday, February 8, 2011

Freebie Love Printable

We're less than a week away from Valentine's Day and I've got love on the brain. This is our first Valentine's Day as a married couple and, while we generally don't get behind the flowers and candy part of the day, I still find myself getting a little sappy and romantic as February 14 approaches.

In honour of Love Day I've created a cute little printable to share with all of you! Just click on the image to get the full-sized version and then print and use however you like. It'll print to fit an 8x10 frame or you can make it smaller and use it for cards or just as a little love note.


I hope you like it and, should you use it, I'd love it if you left a comment to tell me about it!

Monday, February 7, 2011

By the Batch - Honey Florentines

Until yesterday I hadn't yet tackled a Light & Delicate cookie and I think it was because I was a bit nervous. To me Light & Delicate sounded like Easy To Ruin so I was really pleased at how lovely these cookies turned out. They are included in Martha Stewart's Cookies book but the recipe is not available on her website so if this post should disappear you can assume it's because someone asked me to take it down and you'll just have to buy the book ;)


Ingredients:
2 tablespoons unsalted butter
2 tablespoons packed light brown sugar
1 1/2 tablespoons honey
2 tablespoons all-purpose flour
pinch of coarse salt


Directions:
Preheat oven to 375°F. Melt butter, brown sugar, and honey in a small saucepan over medium-low heat.


Transfer to a bowl. Whisk in flour and salt until smooth. Working quickly, drop 1/2 teaspoons of batter onto large baking sheets lined with parchment paper, spacing at least 3 inches apart. Use a measuring spoon to get uniform sized cookies.


Bake cookies until they spread and turn golden brown, about 6 minutes. Let cool on sheets on wire racks. Carefully remove cookies from sheets with your fingers.


According to Sarah:
When I first read the ingredient list I thought there must be a typo. You can't make two dozen cookies with only 7 1/2 tablespoons of ingredients can you? Why yes, you can, and they are delicious!! They taste very much like the toffee bits in a Skor bar. They are amazing on their own but Martha also suggests dipping them in chocolate. I think they would be great crumbled over vanilla ice cream. They took less than 15 minutes to make so these are a great option when you're low on time and ingredients or you have company unexpectedly. These will definitely be made again!

Friday, February 4, 2011

More Paper Hearts!

Ok, I admit that I might be obsessed with making things out of paper hearts. I've never made as many Valentine's Day decorations as I have this year and I've put many miles on my heart punch - still not tired of hearts! I hope you aren't either because tonight I want to show you two more paper heart projects that are quick and inexpensive to make. Both of them are courtesy of Martha Stewart's website and I made them both using less than one whole piece of scrapbooking paper.


The first is Heart Envelopes. Start by cutting a heart from a patterned piece of paper. Pick paper that has a pattern on both sides if you have one. The size of the heart is up to you; obviously the bigger the heart the larger your final envelope will be.


With the side you want on the inside of your envelope facing up, fold the left and right sides in so they meet in the centre.


Then fold the top down.


 Lastly, fold in the point to make the flap of your envelope and you're done!


These cute little envelopes can be used to hold a love note, a little trinket, or even a piece of jewelry. Once you've put the gift inside seal the flap with a sticker.


The second project made out of the same piece of paper (though my instructive photos show a different piece) is a Heart-in-the-Fold Card featuring a heart that unfolds to look like a flower. Start with a square piece of paper. Like the envelopes, the size of the paper you start with will affect the size of your end product.

Fold the paper in half vertically and then unfold. Then fold horizontally and unfold. Turn the paper over and fold it in half diagonally and then unfold again. Turn the paper over again and bring the corners of the diagonal fold up to meet each other. Then press the sides in to form a diamond shape.


Draw a heart shape that lines up with the folded point of your diamond.


The cut the top of your heart out making sure not to cut the point at the bottom.


And that's it! If you've folded it correctly then your heart will unfold to reveal four heart shaped petals.


The last step is to affix the heart to a folded piece of cardstock to finish the card.


Easy, right? Two inexpensive Valentine's Day projects that you can knock off in less than half an hour!